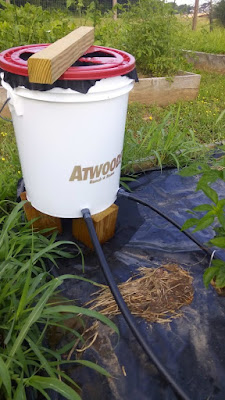
Zero pressure bucket drip irrigation
There are several great reasons everyone should be using drip irrigation compared with simply using a hose or a watering can.
The main disadvantages to drip irrigation:
Terminology
 Emitter considerations
- Water conservation: by delivering water directly to the roots of the plant there is less water lost from evaporation and less water lost to run-off since the soil has a chance to soak up the water before it can drain away. We can also use recycled water or captured rain water to further save precious water resources (OK, you can do this in a watering can too).
- Lower risk of disease: wet leaves can lead to fungus when they can't dry off quickly enough and plants almost always do better when the leaves are dry.
- Effective Nutrient management: Decreasing run-off also helps to keep the nitrogen in the soil from being diluted or washed away. Fertilizer can be added to the bucket and distributed easily with less waste.
- Weed management: Delivering water directly to the plant means less water for weed germination
- Effective labor utilization: Fill the bucket and find something else to do compared to stopping at each plant and watering it individually.

The main disadvantages to drip irrigation:
- The cost and skills required to perform the installation are high.
- Tubing can deteriorate when it is exposed to the UV rays from year round exposure and replacement can add to waste and ultimately a landfill.
- Clean or filtered water is required or the tubing may get clogged causing water flow to be disrupted
Terminology
- GPH = Gallons Per Hour
I have 2 raised beds in a community garden that are covered with black plastic mulch due to the beds being neglected for several years and over-run with weeds. My first bed of squash and tomato plants quickly grew to the point where I could not easily locate the holes in the black plastic to water my plants. Although I was planning on running drip irrigation for both beds, it's too late to run any tubing among all the squash runners.
TIP: Always install the tubing early enough in the season to be able to run it where you need it and when you can still find the planting locations.
It's too late to install drip irrigation in this bed.

I will not address larger plantings or row crops since I have yet to attempt this kind of installation due to the pressure and volume limitations that using a bucket would impose. I am working with low pressure and only 5 gallons of water and I'm detailing my experience with ~10 plants in an 8X16 bed and 50 ft of 1/2" poly hose.
Yes, you can do a longer run with more plants, but you would need to raise the bucket higher off the ground to ensure there is enough pressure to get water down to the other end and refill the bucket to get enough water to each plant.
Assuming equal water distribution, each of my 10 plants gets 64 ounces of water (1/2 gallon) with each fill of the 5 gallon bucket.
The bucket will catch some rain but don't expect it to be very much even in the heaviest of downpours.
The bucket will catch some rain but don't expect it to be very much even in the heaviest of downpours.
Pressure considerations
If you have a tube connected to the bottom of a bucket, that tube will drain all of the water in the bucket as long as the end of the tube is lower than the bottom of the bucket. Plumbers will tell you that you need at least 1/4" of drop for every feet to ensure proper gravity drainage so for my 16ft raised bed, the bucket must be raised at least 4" for water to get to the other end of the bed.
TIP: special consideration of bucket height is required if one end of the bed is higher than the other end, like if you are planting on a hill/incline. It is advisable to locate the bucket on the highest part of the bed even if you need to carry your full water bucket uphill.
Each hole in the tube (drip site) will reduce the water volume and pressure for the remaining drip sites, so if the tubing is too long, there may simply be no water left in the hose to drip.
I'm using a closed loop so both ends of the tube are attached to the same bucket in an attempt to maintain even pressure and water volume.

Some kind of drip emitter is recommended since a simple hole will flow more water closer to the bucket than a hole further away from the bucket. 1/2GPH emitters might be too small to effectively water the plants. The goal is to ensure the entire tube is filled with water as the drip sites release the water a little at a time. I started with 1/2GPH emitters but the unfiltered rain water I used seemed to plug some of the emitters and a few of the drip sites were dry after a few waterings so I pulled them out and left the holes in the tube to drip without emitters. Some of the holes started to close up in the heat of the sun, so I poked some quarter inch barb fittings to keep the holes open. I'll leave the larger openings for the rest of this season because I don't want to spend anymore on 1gph emitters (they cost around 35 cents each) until I place another order for irrigation supplies next spring.
Without emitters, my bucket is draining in less than 5 minutes.
If you can find a used bucket at a restaurant, deli or bake shop it should work well for this project as long as it originally stored something edible. You'll want to avoid motor oil, grease, paint, industrial chemicals etc. You will need a tight fitting lid.
Cut some holes in the top of the lid so you can pour water into the bucket. The lid will be used to hold some kind of porous landscape fabric for a rudimentary prefilter of the water. Make sure the pre-filter is not tight across the top of the bucket, you need it to sag in the middle so it can hold some water when you dump a bucket of water into the top.
Cut some scrap wood into the length you need. You will likely need a minimum of 4" of height for the legs. I had some 4x4 lumber laying around so I screwed 3 4" lengths to the bottom of the bucket using 2 exterior grade screws for each leg.

Without emitters, my bucket is draining in less than 5 minutes.
Keep in mind that emitters rated at 1/2GPH will not flow that much when you are operating with no pressure or gravity feed. Those flow ratings are based on attaching to pressurized city water.Bucket modifications
If you can find a used bucket at a restaurant, deli or bake shop it should work well for this project as long as it originally stored something edible. You'll want to avoid motor oil, grease, paint, industrial chemicals etc. You will need a tight fitting lid.
Cut some holes in the top of the lid so you can pour water into the bucket. The lid will be used to hold some kind of porous landscape fabric for a rudimentary prefilter of the water. Make sure the pre-filter is not tight across the top of the bucket, you need it to sag in the middle so it can hold some water when you dump a bucket of water into the top.
Cut some scrap wood into the length you need. You will likely need a minimum of 4" of height for the legs. I had some 4x4 lumber laying around so I screwed 3 4" lengths to the bottom of the bucket using 2 exterior grade screws for each leg.
TIP: As a side benefit, you can also drill some holes (various sizes) in 1 or more of the inside faces of the legs to create a mini Bee hotel. This is to give the precious pollinators a place to nest in your garden. Different bees will use the different sized holes.
Drill 2 holes in the side/bottom of the bucket and screw in the 1/2" barb fittings. I used a 3/4 drill bit but you should verify with the fitting you have.
Bee hotel from my garden made of scrap wood


Don't worry if there are any leaks either from the screw attachment points for the legs or around the threads of the barb fittings. We don't need this project to be water tight.
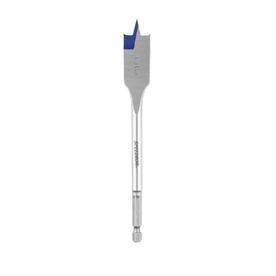
Buy a 50ft roll of black poly tubing, you'll find it in the irrigation section of your local big box store. Arrange the black poly tubing around your bed ensuring that the tubing run touches each of your plants. You will either poke a hole for the emitter or drill a hole in the tubing. I find it easier to drill a small hole with my battery operated drill than to purchase the special punches that irrigation supply houses sell. I'm using a 5/64" drill bit. Be very careful not to drill thru the other side of the tube (or into your hand).


Comments
Post a Comment